How to Use the Fanver API – Automate Your File Uploads
Uploading files manually works great for occasional uploads. But if you regularly work with photos, videos, or other digital content, automation can save a lot of time.
The Fanver API allows you to connect Fanver directly to your own applications, scripts, websites, and automated workflows.
In this guide, we'll explain how the Fanver API works, where to find your API token, how to upload files, and how to create Fanver links automatically.
What Is the Fanver API?
An API (Application Programming Interface) allows different applications to communicate with each other.
Normally, uploading a file to Fanver looks like this:
Open Fanver → Select File → Upload → Copy Share Link
With the API, this process can be automated:
Your Application → Fanver API → Upload File → Receive Fanver URL
This can be particularly useful for creators, agencies, developers, and teams handling large amounts of content.
Where to Find Your Fanver API Token
Log in to your Fanver account and open the API section in your dashboard.
If API access is enabled for your account, you'll see:
Your API Token
Your API Status
Upload endpoints
Required request data
Example API responses
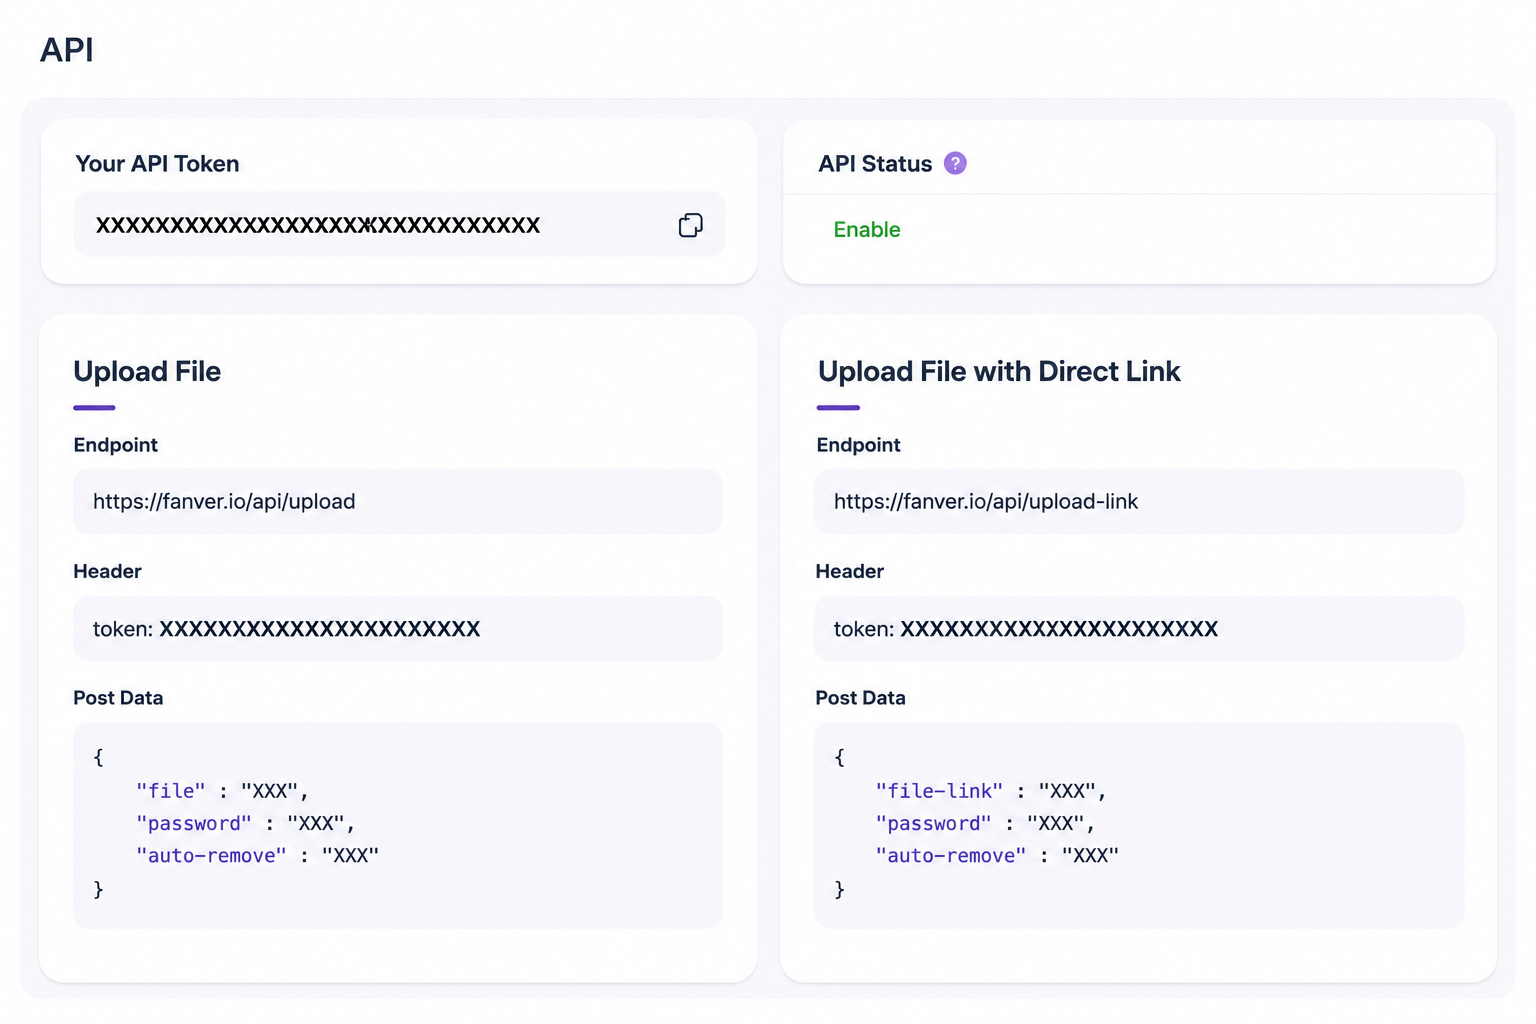
Example: The Fanver API dashboard showing API status, available endpoints, and request information.
Important: Keep your API token private. Never share your token publicly, publish it in screenshots, or include it in frontend code.
Your API token works like a credential that identifies your Fanver account when an application sends a request to the API.
Fanver API Endpoints
Fanver currently provides two upload methods.
1. Upload a File
Use this endpoint when the actual file is available on your device, server, or application.
Endpoint:
POST https://fanver.io/api/uploadThe request requires your API token in the request header:
token: YOUR_API_TOKENThe available POST data includes:
file
password
auto-remove
The file parameter contains the file you want to upload.
The optional parameters can be used to configure additional properties such as password protection or automatic removal.
2. Upload a File from a Direct Link
Fanver can also fetch a file directly from an existing URL.
This is useful when the file is already available online and you don't want to download it first and then upload it manually.
Use:
POST https://fanver.io/api/upload-linkAgain, your API token must be included in the request header:
token: YOUR_API_TOKENThe POST data includes:
file-link
password
auto-remove
Instead of sending the file itself, you provide a direct URL to the file using file-link.
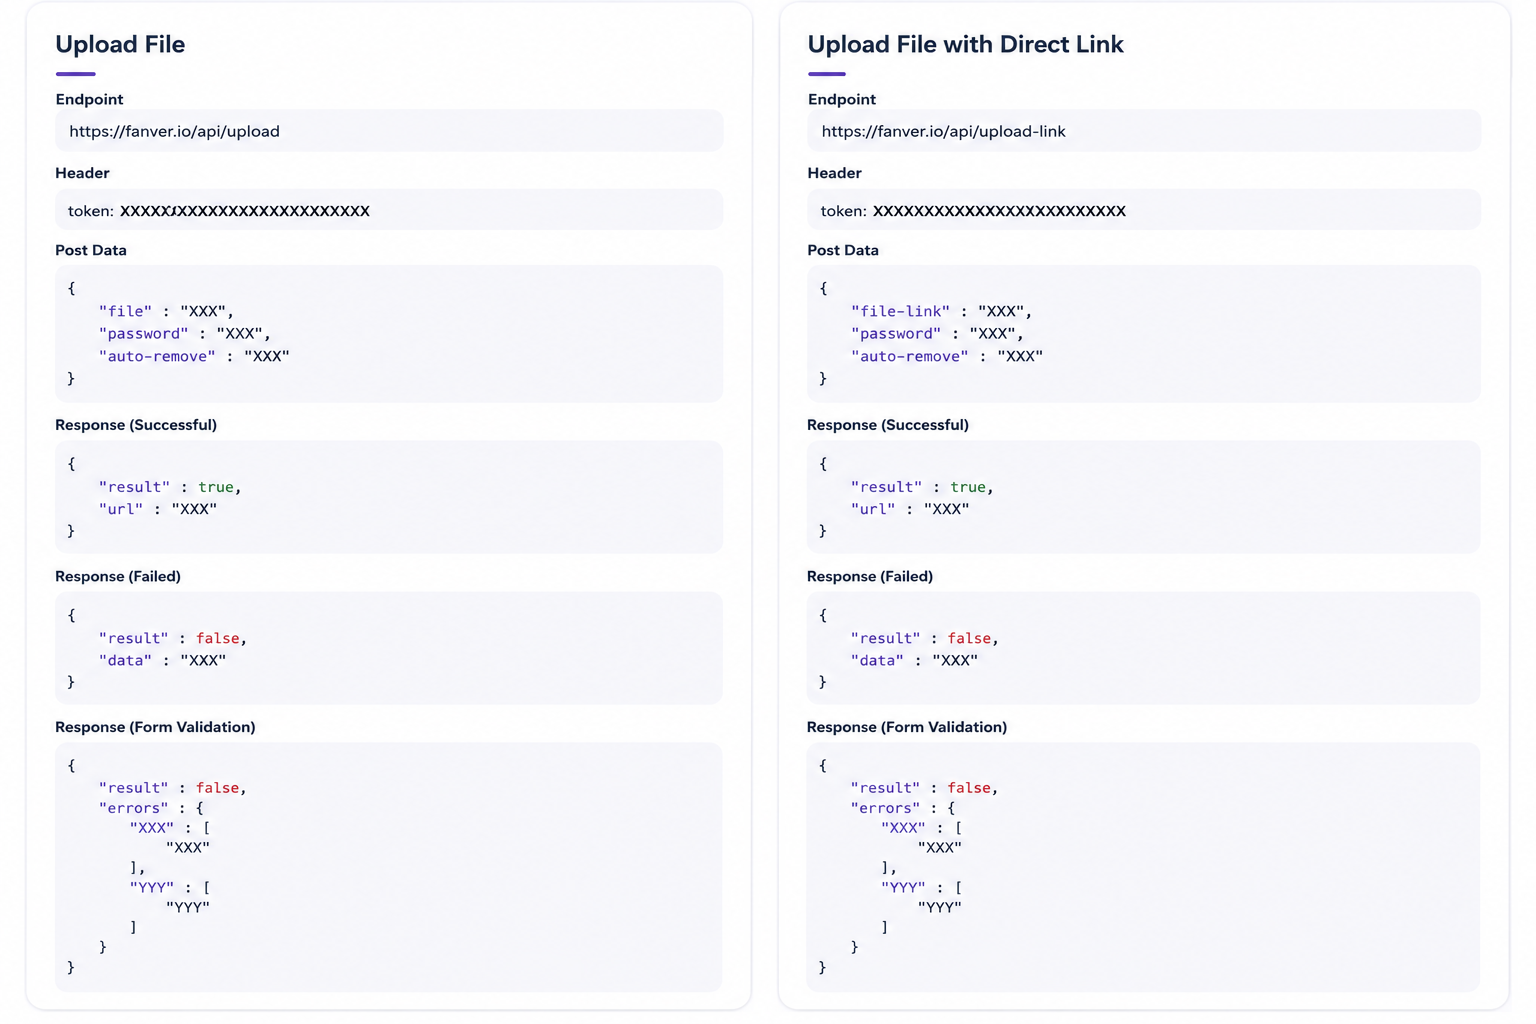
Fanver supports both direct file uploads and importing files from an existing direct URL.
Understanding the API Response
After a successful upload, Fanver returns a response containing the result and generated URL.
A successful response follows this structure:
{ "result": true, "url": "YOUR_GENERATED_URL"
}
The important part is the url.
Your application can automatically save this URL, display it to the user, or send it to another application.
For example:
Upload → Fanver processes file → API returns URL → Your application saves URL
No manual copying is required.
What Happens If an Upload Fails?
If Fanver cannot process the request, the API returns:
{ "result": false, "data": "ERROR_MESSAGE"
}
Validation errors can also return additional information about which field caused the problem.
Your application should therefore always check whether:
result = truebefore using the returned URL.
Example: Uploading a File with cURL
A server-side integration can send an HTTP POST request to the Fanver upload endpoint.
A simplified cURL example looks like this:
curl -X POST "https://fanver.io/api/upload" \ -H "token: YOUR_API_TOKEN" \ -F "[email protected]"Replace:
YOUR_API_TOKENwith your personal API token.
And replace:
example.jpgwith the file you want to upload.
Never publish your real API token inside source code that is publicly accessible.
Example: Importing a File from a URL
If a file already exists online, you can use the direct-link endpoint instead.
Conceptually, the request looks like this:
curl -X POST "https://fanver.io/api/upload-link" \ -H "token: YOUR_API_TOKEN" \ -F "file-link=https://example.com/example.jpg"Fanver can then process the provided direct file URL without requiring you to manually download and re-upload the file first.
Password-Protected Uploads
The API also provides a password field.
This allows an integration to specify a password as part of the upload request when supported by the selected account configuration.
For example, an automated workflow could create protected uploads instead of requiring the creator to configure every upload manually.
Automatic File Removal
Another available parameter is:
auto-removeThis can be used to specify automatic removal behavior supported by Fanver.
This can be useful for temporary content and automated workflows where files should not remain available indefinitely.
Example Creator Workflow
Imagine a creator regularly producing new photo and video content.
Instead of uploading every file manually, a custom application could automate the process:
New Content
↓
Upload Script
↓
Fanver API
↓
Fanver File Hosting
↓
Generated Share URL
The returned URL could then automatically be stored in a database, content calendar, CRM, or another internal tool.
Example Agency Workflow
The API becomes even more useful when managing content at scale.
Imagine an agency working with multiple creators.
Instead of employees manually uploading hundreds of files, an internal agency dashboard could communicate directly with Fanver:
Creator Content → Agency Dashboard → Fanver API → File Uploaded → Share URL Returned
The agency's software can automatically store the returned URL alongside the corresponding creator and content entry.
This can significantly reduce repetitive manual work.
Connect Fanver to Automation Tools
You don't necessarily need to develop a complete application to benefit from the API.
Automation platforms that support custom HTTP requests can potentially communicate with the Fanver API.
A workflow could look like:
New File → HTTP Request → Fanver API → Receive URL → Save URL
This makes it possible to integrate Fanver into larger content automation workflows.
Fanver API Security
Your API token should be treated like a password.
Follow these basic security practices:
Never publish your API token.
Never show your real token in screenshots or tutorials.
Never commit your API token to a public Git repository.
Avoid exposing the token in browser-side JavaScript.
Store API credentials securely on your server.
Replace your token immediately if it becomes exposed.
If you're publishing tutorials or screenshots, always replace your real token with something such as:
YOUR_API_TOKENWho Is the Fanver API For?
Creators
Automate repetitive uploads and integrate file hosting into your existing content workflow.
Creator Agencies
Build internal tools that automatically upload and organize content for multiple creators.
Developers
Use Fanver as the file-hosting component of your own applications and services.
Businesses
Create automated workflows for uploading, storing, and sharing large amounts of digital content.
Start Building with the Fanver API
The Fanver API makes it possible to use Fanver beyond the standard web dashboard.
With the API, you can:
Upload files programmatically
Import files from direct URLs
Receive generated Fanver URLs automatically
Build custom creator and agency workflows
Connect Fanver to your own applications
Reduce repetitive manual uploads
To get started, log in to your Fanver dashboard, open the API section, and check whether API access is enabled for your account.
From there, you can copy your API token and start integrating Fanver into your workflow.
Start hosting and automating your content with Fanver.